
NKannuku User Manual V1.0.0
05 Mar 2025
NKannaku is a mobile application inspired by Nagarathar Accounting principles. The Nagarathar or Nattukottai Nagarathar (also known as Nattukottai Chettiar) is a Tamil caste found native in Tamil Nadu, India. Nagarathars are a mercantile community who are traditionally involved in commerce, banking and money lending (Source:s Nagarathar From Wikipedia).
Effortlessly manage personal accounting with NKannaku, designed mainly for personal accounting. Track income, expenses, profit/loss, assets and liability. Generate essential reports, and visualize account's data in daily or monthly charts. Following quick-access features and account management tools provide for a complete view of the accounts.
Android: Required version: Version 5 and above
iOS: Required version: Version 15 and above
A splash screen is the first screen users will see when they open the application. It provides a visual introduction while loading and this screen also used when refreshing the application.
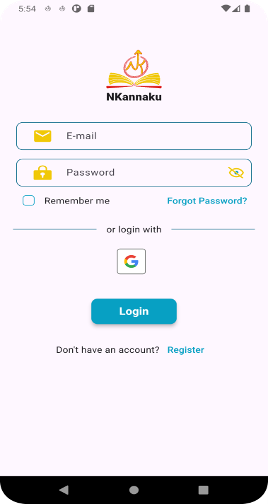
Users can access their accounts using three authentication methods: Google Login, Apple Login, and standard login (using email and password).
Users can click Register to create an account in the Login screen if they do not have an existing account.
NOTE: Users cannot use the same email address for both their apple and google login.
Warning: After logging in, if the user remains inactive for 15 minutes, they will be redirected to the login page.
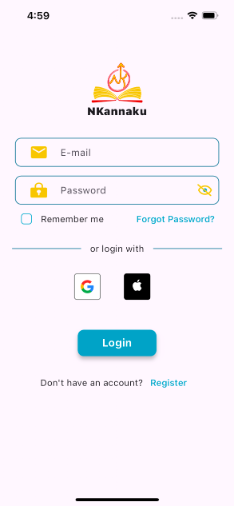
To login, enter a registered email address and password, then click Login to complete the verification. If the subscription has expired, user will be redirected to the subscription screen to renew and regain access. If the user don't have an account, then need to register first or log in using Google/Apple account. Users can click Remember Me to continue working with the application without having to login again.

Allows users to login with their Google account.
NOTE: On Android, only Google Login is allowed.
Users can click the Google logo to open Google authentication, they can select the account, and authenticate. Users will be redirected to the subscription screen.

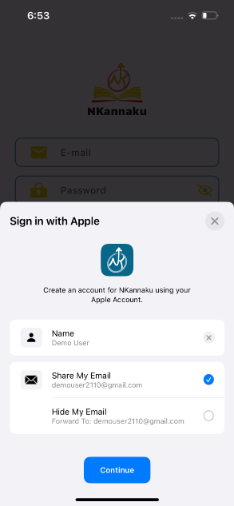
Allows users to log in with their Apple ID.
On iOS, both Apple and Google login are allowed.
Users can click the Apple logo to open Apple authentication. After verifying their Apple ID, they will be redirected to Subscription screen.
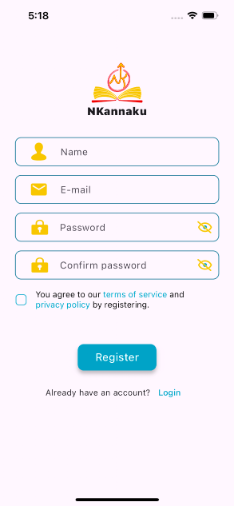
1. Name:
2. Email:
3. Password:
4. Confirm Password:
5. Checkbox:
6. Register:
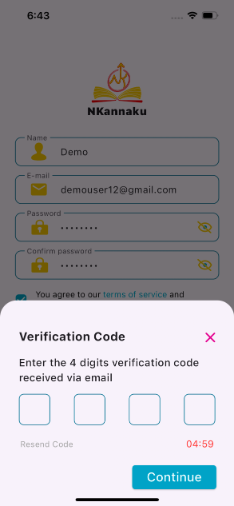
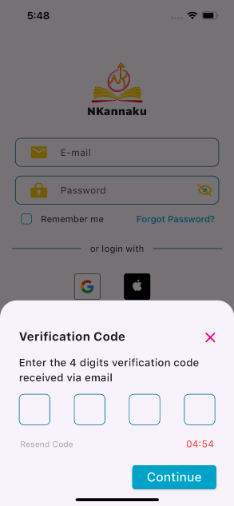
If the email id is valid, a 4-digit verification code will be send to the email address.
Enter the verification code received via email to verify the email id.
The Verification code is valid for 5 minutes. After 5 minutes the user can click Resend Code to receive a new code to the email.
Click Continue to complete verification. The user will be redirected to the subscription screen.
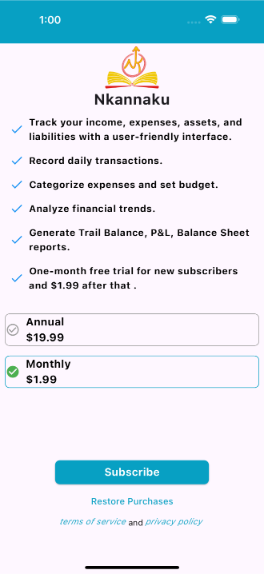
Verification Code Completed: Once the code verification is successfully completed, the subscription screen with details will be displayed if there is no valid subscription.
Subscription Option Selection: The user can choose between annual or monthly subscription plans and click Subscribe.
Payment and Dashboard Access: Upon successful payment, the user will be redirected to the dashboard screen.
Login with Expired Email: If the user logs in with the expired email ID, they will be redirected to the subscription screen where they can select either the annual or monthly plan and proceed to the dashboard screen.
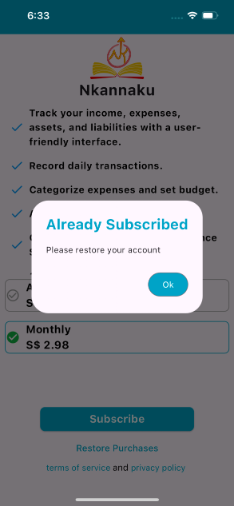
If the user clicks Subscribe but already has an active subscription plan, a popup with message Already Subscribed will appear.

If the user clicks Restore Purchase but doesn't have an active subscription plan, a popup with message No transactions! will appear.
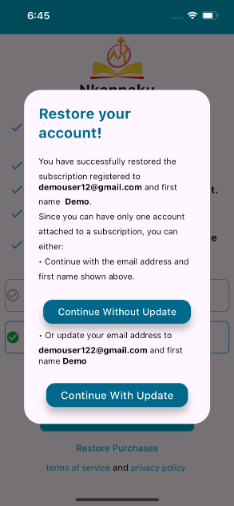
Registering Another Email ID: If user registers with a new email ID, they will be redirected to the subscription screen. If the device already has an active subscription, then click Restore Purchase to see a popup with two options:
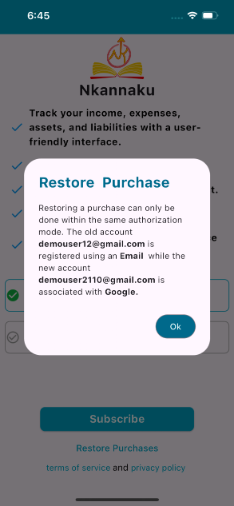
When a user login with a different Google or Apple account, they will be redirected to the subscription screen. A Restore Purchase popup is then displayed, allowing them to retrieve their previous subscription. After clicking OK they will be redirected to the login screen.
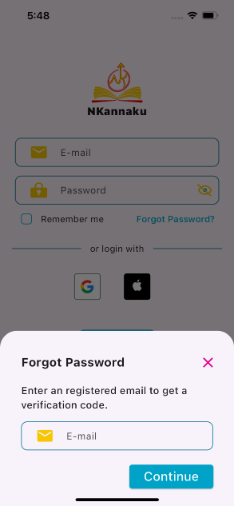
Email: Provide the email address used for the Nkannaku account.
Click Continue to receive a verification code via email.
Verification Code: Enter the code sent to the email.
The Verification Code is valid for 5 minutes. After 5 minutes the user can click Resend Code to receive a new code to the email.
Click Continue to complete verification. The user will be redirected to the reset password screen.
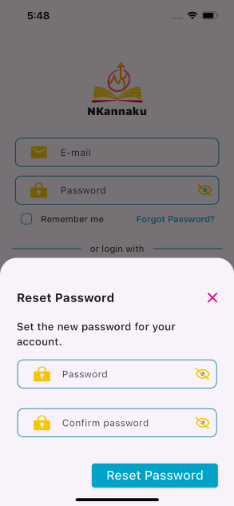
Enter Password: Type your new password.
Confirm Password: Re-enter your new password to confirm.
Click Reset Password to complete the reset password process.
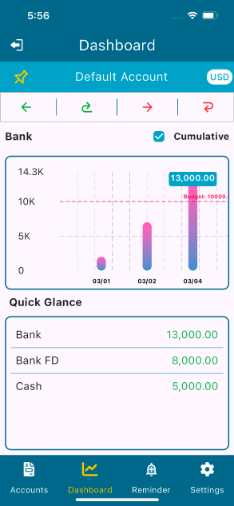
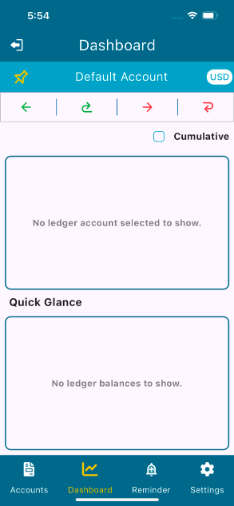
After logging in, the dashboard screen displays transactions of selected Ledger Account as graph and balance of selected ledger accounts as quick glance.
Need to select the Ledger Accounts in the Dashboard Settings to display in Dashboard. If none selected, then the message No ledger account selected to show and No ledger balances to show will be displayed.
Select Cumulative to view the total amount displayed on the graph based on the dashboard setting selection (weekly, monthly, or daily).
Click and hold on the bars in the graph to display the value of the bar.
If there is no data in the selected Ledger Account, then the message No transaction done will be displayed.
The graph data is displayed on a daily, monthly, or yearly basis, depending on the selection made in the Dashboard Settings.
The Quick Glance section shows the balance for the selected ledger account in the Dashboard Settings.
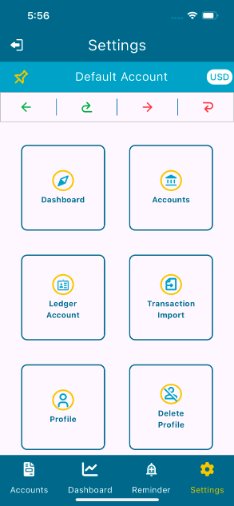
The Settings screen includes the following options
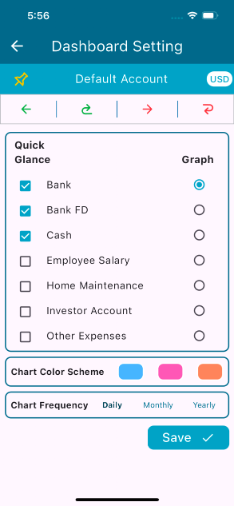
Quick Glance: Select Ledger Accounts whose balance needs to be shown in the quick glance section of the Dashboard.
Graph: Choose the Ledger Account for the graph in the Dashboard.
Graph Color: Select the desired color for the graph. The graph will be displayed in the color selected in this section.
Chart Frequency: Choose the frequency of the transaction data for the graph. Available frequencies are daily, monthly and yearly.
Click Save and go the Dashboard to view the updated data in the graph and quick glance.
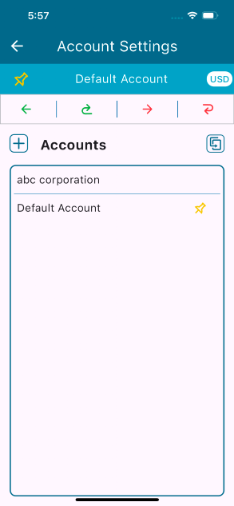
Users can create and manage accounts.
Add Account: Create a new account.
Edit Account: Click on an account to modify the details of an existing account.
Delete Account: Swipe right to left over an account to remove it. Note that pinned accounts cannot be deleted.
Duplicate Account: Create a copy of an existing account.
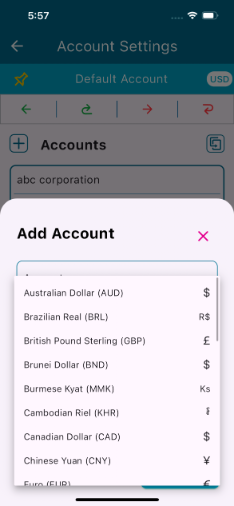
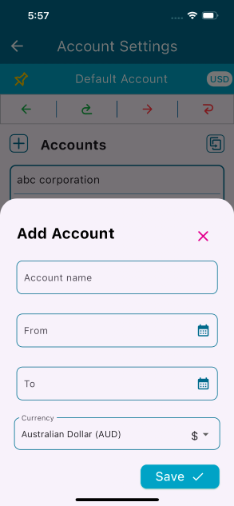
To create a new account for the user.
Account Name: Enter the name of the account. Special character not allowed and maximum length 75 characters.
From Date: Enter the start date for the account.
To Date: Enter the end date for the account.
Note: Transactions are allowed with in From and To dates.
Currency: Select the currency associated with the account.
Note: Currency conversion needs to be handled by the user outside the application.
Click Save to add new account.
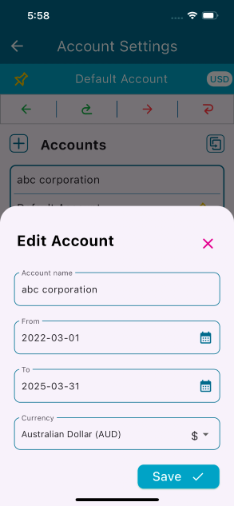
To update and change an existing account.
Account Name: Enter the new name for the account. Special character not allowed and maximum length 75 characters.
From Date: Update the start date of the account.
To Date: Update the end date of the account.
Currency: Modify the currency of the account.
Click Save to apply the changes.
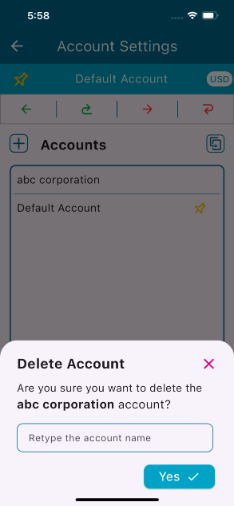
Swipe right to left over the account that needs to be deleted.
Retype the account name to confirm the deletion.
Click Yes to delete the account.
NOTE: Pinned accounts cannot be deleted.
Warning: If the user deletes the account, all the ledgers and transactions will also be deleted.
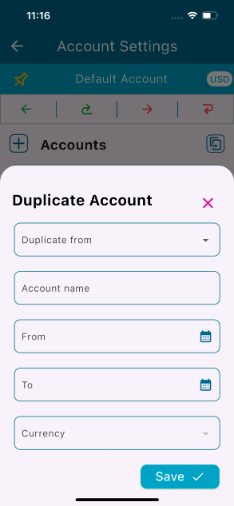
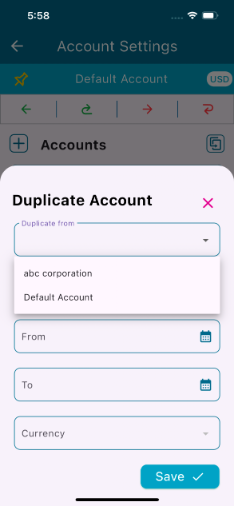
This is to make a copy of an existing account in order to get the same settings of the that account, especially Ledger Accounts.
Click  to duplicate an existing account.
Duplicate from: Choose an existing account that needs to be duplicated.
Account Name: Enter the new account name that is going to be duplicated, special character not allowed and maximum length 75 characters.
From Date: Enter the start date for the duplicated account.
To Date: Enter the end date for the duplicated account.
Note: Transactions are allowed to enter with in From and To dates.
Currency: Select the currency for the duplicated account.
Note: Currency conversion need to be handled by the user outside the application.
Click Save to create the duplicate account.
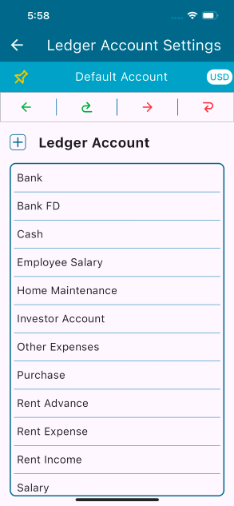
Each account comes with default ledger accounts. The user can perform the following functions:
Add Ledger: Create a new ledger account for this account.
Edit Ledger: Modify the details of any ledger accounts.
Delete Ledger: Remove any ledger account from this account.
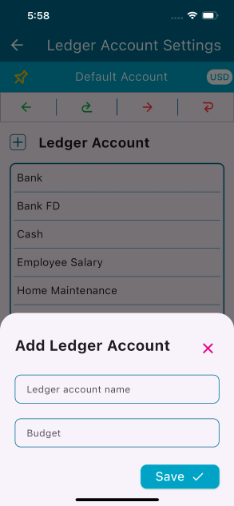
To create a new ledger account to the pinned account.
Click on  to add new ledger account.
Ledger account name: Enter the new ledger account name, special character not allowed maximum length 75 characters.
Budget: Enter budget for the ledger account, maximum length 9 digit.
Click Save to add new ledger account.
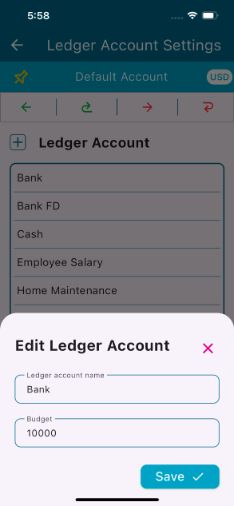
To modify an existing ledger account. Click on the ledger account to modify.
Ledger account name: Change the ledger account name.
Budget: Change the budget of the ledger account.
Click Save to apply the changes.
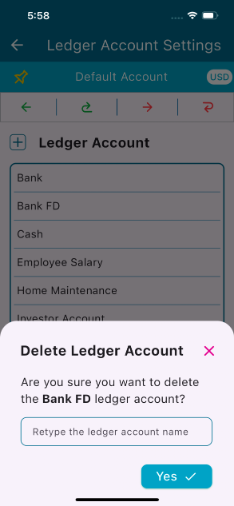
Swipe right to left over the ledger account that needs to be deleted.
Retype the ledger account name to confirm the deletion.
Click Yes to delete the ledger account.
Warning: If the user deletes the ledger, all the transactions will also be deleted.
Click Template to download a template CSV file for uploading multiple transactions. This template has the structure which can be followed to prepare the data for importing.
Tap on Click here to select a file to choose the appropriate file.
Click Upload to upload the transactions from the CSV file.
Note: If new ledgers are found in CSV file a checkbox will appear, select the checkbox before uploading to create new ledgers while uploading the transactions.

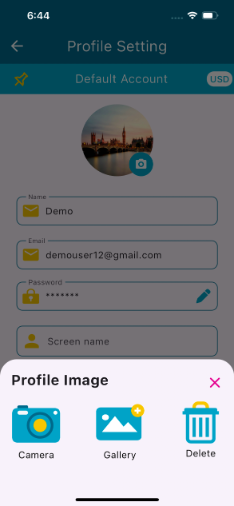
Click on the Profile picture (camera) to redirect to the Camera and Gallery. After selecting an image, the delete option will appear.
When a user click Delete, the image will be removed.
Name: Users can update their name, special characters not allowed.
Email: The email id used for registration and it is not editable.
Select the checkbox Send Reminder to enable reminders to be send to on this device.
Password: Click Password to redirect to the change password screen.
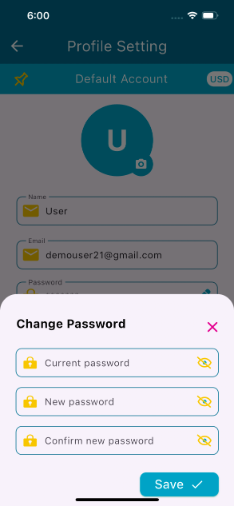
Update your password.
Password must be more than 8 characters, must contain at least one uppercase letter, one lowercase letter, one number and one special character (any special character is allowed).
Maximum length 75 characters.
Click Save to apply the changes.
After saving, user will be redirected to the login screen.
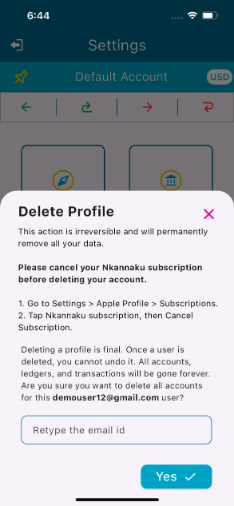
This will permanently remove the user and the associated data. The action is irreversible.
Important: Before deleting your account, make sure to cancel your subscription.
Android: Go to Settings > Apple Profile > Subscriptions. Tap Nkannaku subscription, then Cancel Subscription.
Apple: Go to Google Play Store > click on your account > Payments & subscriptions > Subscriptions. Tap Nkannaku subscription, then Cancel Subscription.
Retype the email id in the input box to confirm deletion.
The NKannaku profile account will then be deleted.
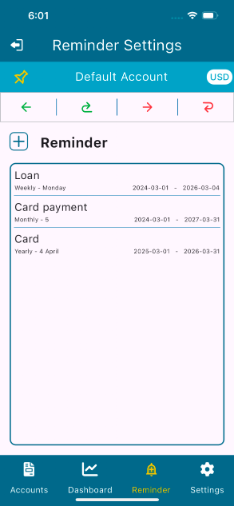
Click on to set new reminders to keep track of important tasks and never forget them.
Possible to set Weekly, Monthly, and Yearly reminders.
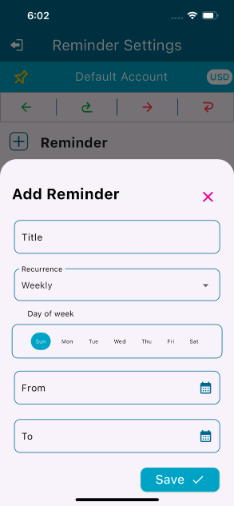
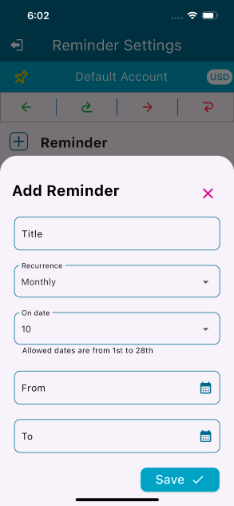
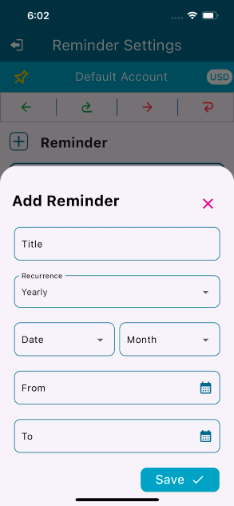
Reminder weekly, monthly and yearly reminder.
Title: Give a meaningful title that helps to remember when notification popup.
Recurrence: Choose Weekly, Monthly, or Yearly. Depends on the selection, choose day, date, or date and Month in the next input.
From and To: Choose the From and To date for the reminder recurrence period.
Click Save to save the reminder.
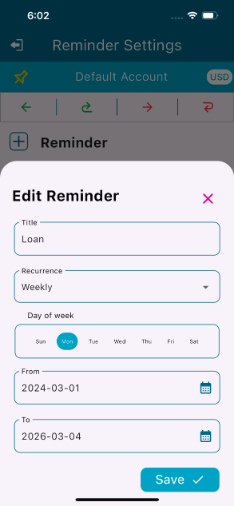
Click on the reminder to update and change an existing reminder.
Title: Enter the new title and maximum length 75 characters.
Recurrence: Modify the weekly, monthly and yearly task.
Day of the week: Modify the day of the week.
Note: If monthly then the date can be changed and for yearly the date and month can be changed.
From and To: Modify the From and to date for the reminder recurrence period.
Click Save to apply the changes.
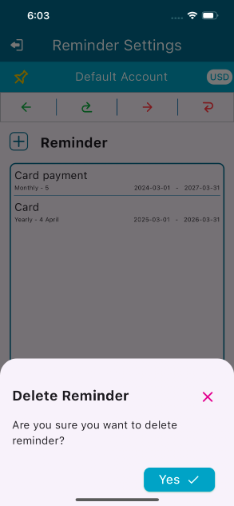
Swipe right to left over the reminder that needs to be deleted.
Click Yes to delete the reminder.
Click on one of the arrows ![]() to enter transaction details. It redirects to transaction details screen. This set of arrows are available in most of the screens that allows users to enter transaction from any screen.
to enter transaction details. It redirects to transaction details screen. This set of arrows are available in most of the screens that allows users to enter transaction from any screen.
To prepare Profit/Loss statement and Balance Sheet correctly, accurate/detailed entry of transaction details are important.
There are four types of transactions. They are  - Income,
  - Credit,
  - Expense, and
  - Debit.
- Income: Use income for transactions like Salary, Rental, etc. That do not need to pay back to the source. Money flows in but do not flows out.
- Credit: Use credit for transactions like credit card, loan, etc. That needs to be paid back to the source. Money flows in and flows out.
- Expense: Use expense for transactions like transport, subscription, maintenance, etc. The receiver will not return at the end. Money flows out but do not flows in.
- Debit: Use debit for transactions like furniture purchase (asset), loan (employee advance), etc. The receiver will return at the end. Money flows out and flows in.
Date: The specific date when the transaction occurred.
From and To: This is to select from ledger account and to ledger account. Both ledgers have to be different.
Via Cash checkbox is used to enter double transactions, example if the user want to enter from credit card to grocery shop. In actual case it is from credit card to cash and then from cash to grocery shop. Both ledgers cannot be the same, and can not be cash. When one transaction is deleted the corresponding transaction will get deleted also.
Note: Cash type also has four - Income, Expense, Debit and Credit. Type and Cash Type cannot be the same.
Proof: Attach any supporting documents, such as transaction bills, to validate the entry.
Note: There is image size limit for the proof, please take outside the app, reduce the size and then choose from gallery.

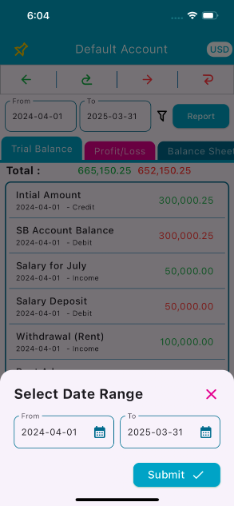
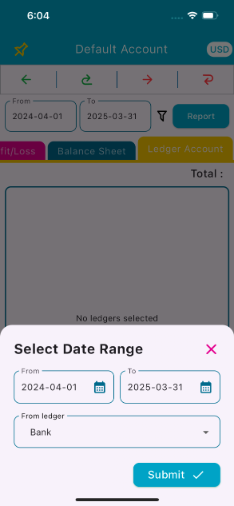
Users can use the tabs on top to navigate to different parts of accounts. There are 4 tabs Trial Balance, Profit/Loss, Balance Sheet, and Ledger Account.
The main purpose of a trial balance is to show all transactions of the accounts in one screen. The total of the debit column does not equal the total of the credit column, it indicates that there may be errors in the transaction entries. The select range filter works the same way for Profit/Loss and Balance Sheet.
Click Report to download the transaction as PDF report. The Report works the same way for Profit/Loss, Balance Sheet, and Ledger Account.

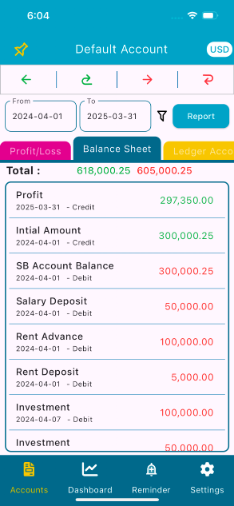
The Profit & Loss statement is crucial for assessing the financial health, as it shows whether there is profit or loss for the account on a given time or closing.
The total value of the assets is equal to the total value of the liabilities and shareholders’ equity. Asset includes cash balance (user need to count and enter as one entry) and Profit/Loss.
Account's Profit/Loss value appears at the top of the balance sheet.
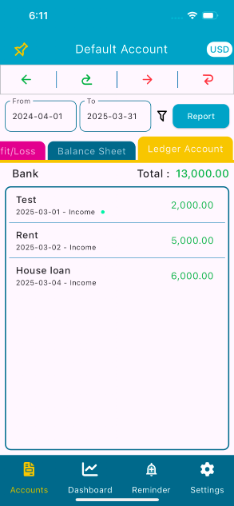
Ledger accounts shows the transactions related to specific account. The details like the ledger account name, date, description, and transaction type are shown in this tab.
Click on any transaction to modify, this should open the transaction details.
The edit option is used for modifying the trial balance, profit/loss, balance sheet, and ledger account transactions.
Make the necessary changes to the fields you need to update.
The down arrow can be used download proof.
Once you’ve made your changes, Click the Save to update the transaction.
Swipe right to left over the transaction that needs to be deleted.
Click Yes to delete the transaction.
The delete option is used for removing the trial balance, profit/loss, balance sheet, and ledger account transactions.
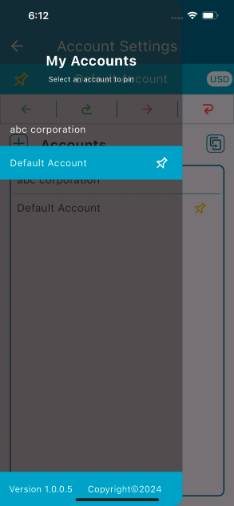
Pinned Account: Click on  and then click on the account to quickly switch accounts. The pinned account will be used for all account specific user activities including transactions and reports.

Weekly, Monthly, and Yearly Reminders: Notifications will be sent as per the set reminder schedule (weekly, monthly, yearly).
Password Change Notification: If the user changes their password in the profile, a notification will be sent to the device associated with the user's account that is currently logged in.
Account Deletion Notification: If the user deletes their account from the profile, a notification will be sent.
Subscription Cancellation/Expiration: A notification will be sent if the user's subscription is canceled or expires.
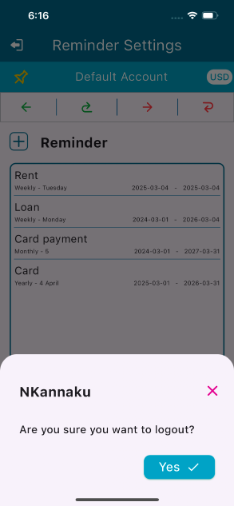
When the user clicks Logout  , a popup will appear.
click Yes to logout and redirected to the login screen.
Note: If the user changes their password in the profile, this popup will also appear.
© 2025 CTEK. All rights reserved.
1 Scotts Road, #24-10, Shaw Centre
Singapore 228208
Email: info@ctek.com.sg